Simplified Stenner chemical tube maintenance for peak performance
In previous issues we reviewed the overall design and some of the maintenance requirements of the popular Stenner chemical feeder line. In this article we will pinpoint the quick and easy way to service your own chemical feeder tubes in order to restore your Stenner pump to original pumping specifications.
The enclosed link will take you to the CESWaterQuality.com website location of the complete factory tube-changing manual for the “classic” Model 45 and 85 feeders.
http://www.ceswaterquality.com/stenner.php
You can print this manual and use it to carefully follow the simple step-by-step instructions. The manual is very comprehensive and includes detailed information on the following:
-
•Safety Information: Precautions from electrical, chemical exposure, pressure, fire, etc. Good details on the major safety pitfalls of feeder maintenance.
-
•Preparation: Flushing the lines, disconnecting the suction & discharge tubing, and connecting to a properly GFI protected outlet for service.
-
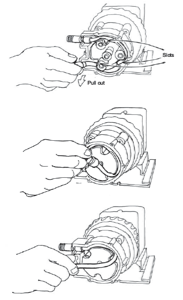
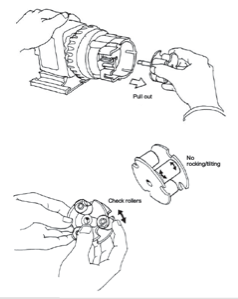
•Removing Old Tube: Removing screws, setting pump on low, and using the motor power to remove the tube from the roller assembly.
-
•After Removing Tube: Removing the roller assembly and shaft, checking roller operation, re-greasing and re-installing shaft and rollers.
-
•Installing new Tube: Allowing pump motor (on L setting) to install new tube. Greasing the copper cover bushing (with AquaShield).
-
•Centering the Tube: Using the motor (on High) to align the tube in the middle of the tube housing.
-
•Check out entire system: Checking suction tubing, pressure tubing, injection point, suction strainer, and all nuts and ferrules before putting the feeder back into operation.
But before starting..... how do you know it’s TIME to change the tube on your Stenner Feeder? Here’s a few of the most common reasons:
-
 The tube is leaking either from the clear tube-housing, or from the connection between the threaded tube ends...or even from the tube wall itself.
 -
The feeder “recovery” rate is slow and is falling behind your desired chlorine or pH levels.
-
Your CES chemical controller registers a “failsafe” or “feed alert” alarm on either the pH or Chlorine feed.
-
The depression made of the roller pressing the tube against the clear wall of the tube housing is either oval or triangular in shape, and not square as with new tubes.
-
The pool filtration system is sending pool water “backwards” through the feeder and it is filling up (and sometimes overflowing) the chemical vat with pool water.
Here are some additional suggestions from the CES tech staff that will help make repair and maintenance quicker and easier.
Get to the cause of the problem: Very seldom does a Stenner tube break on its own. It is normally caused by a clogged injector, bad rollers, suction leak, or other mechanical breakdown. During and after the tube repair, get to the source of the problem so that it does not reoccur.
Replace tube in the workshop: While experienced technicians and operators can replace tubes with the chemical feeder in the feeder bracket, it is much easier to replace in the controlled conditions of a workbench or shop.
Upside down is easier: If you are replacing the tube while the pump is still in the bracket, turn the pump upside down for easier access to the tube housing.
Stock a few spare parts: Stenner feeders are the industry’s MOST economical feeders to operate. Stock some spare tubes, nuts, ferrules, a roller assembly, and shaft....and keep your feeder running for years.
Keep a spare: Keep your old tube housing complete, refurbish with a new tube and roller assembly (if necessary), and keep on the shelf to give you a quick fix-er-upper in the event of any sudden failure of your feeder tube. Better yet, some customers will even stock a spare pump to
Work SMART not HARD: Follow Stenner instructions and allow the power of the Stenner motor to “remove” and to “re-install” the tube. Trying to muscle the feeder tube into position does not work as well as using good technique.
Change tubing periodically: Change suction and discharge tubing once a year or whenever it becomes brittle or discolored. Use only UV-resistant (black) tubing in outdoor applications.
CES will gladly help you maintain your Stenner pumping systems by including them in our monthly, quarterly, or annual Preventive Maintenance (PM) Programs. We will also work with your staff to train them how to conduct their own troubleshooting, maintenance, or repair.
We also have one of the largest inventories of feeders, components, parts, and accessories available for same-day shipping at terrific prices.
Please contact your CES rep for more information, to schedule a service or training session, or for a price quote.
Saturday, September 1, 2007


Use the enclosed link (below) to access detailed step-by-step instructions on the best way to repair your Stenner tubes.
Historically, the Stenner tube failure has been caused by some other mechanical problem. During and after repair, take the time to troubleshoot the injector, tubing, rollers, shaft, and other components to avoid repeat issues.


The Stenner tube repair manual includes important notes, safety warnings, and tips on all facets of tube maintenance and repair. One of a full series of manuals from Stenner.